This post is also available in:

 Deutsch (German)
The observant blog reader might have in post 2 thought that cghove has a lot of green spots on the map, this is because he also has a demo user that has no found it logs, to use for illustrations and during this blog series you will see that I will invite the user cghove into this trip and show how cachetur works when you are planning with others.
The trip thus far
I have now made a small car trip with 23 waypoints.

These are now the order of the map, and we see that the list of cachetur gives us some extra information like this icon ![]() which tells us that this cache is a little way from the route, by hovering the mouse over we see distance from our route. We also have an indicator of whether it has been posted DNF, NM logs or equivalent as the latest logs on the cache.
which tells us that this cache is a little way from the route, by hovering the mouse over we see distance from our route. We also have an indicator of whether it has been posted DNF, NM logs or equivalent as the latest logs on the cache.
Processing of the trip
When I followed the map I saw that there are ferries on this trip, and it is nice to be able to get information about them during the trip. Now I know I have to take 2 ferries: Vestnes-Molde and Kanestraum-Halsa, and I want to add these 2 ferries into the trip.
We can do this in 2 ways, one is via the Geocoding function found in Tools and resources, but this both requires that you know what the ferry port is called, and that the information is stored in Openstreetmap, so it’s not always that this will work.
The map on cachetur, which we find at the bottom of the trip page, gives us a clear indication that here is the ferry. What I do is that I look at the map find that the ferry is between waypoints X and X and I put a new insertion point between these 2 and right-click on ferry terminal on the map.
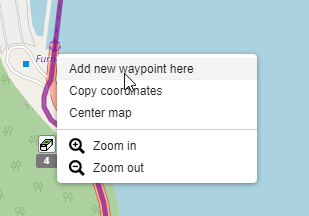 Select Add new waypoint here
 And the coordinates will be entered in automaticaly, I choose the best waypoint type. Here I have chosen the Type Station / Stop / Terminal and not Boat, This is because Boat is a heading and is therefore not included in route calculation. I enter the name of the ferry port, and of course I have googled the timetables and add this into the note field.
In addition, I do the same on the opposite side, but I do not add anything in notes. This is something I usually do because, as I will show a little later, I would like the cachetur to calculate ETA for me so I suppose I will take the ferry at the desired time, the timetable states that the ferry uses for example 40 minutes , but I know that it can take 50 minutes before I can drive off, depending on whether I’m the first or last car on the ferry. So I override arrival time manually, to get a better indication of when I can expect to be at waypoints further ahead.

Here we see that the waypoints for ferry terminals have come in and I have notes about timetables
Processing of waypoints
Processing of waypoints, it’s always nice to be as prepared as possible when you go on a trip, to save time.
Something that is time-saving is to read descriptions, especially to find out if there are any tasks we need to solve to find the cache.
Many COs are good at adding information in the description as well as parking coordinates and additional waypoints, alternatively provide information about this in the cache description. We see in the waypoint list that behind all waypoints we have a ![]() Icon, if we press this, we’ll get the full cache description, and we’ll see extra waypoints at the bottom, reading the description is something that’s always wise to do, toknow what’s going to meat us at GZ.
Icon, if we press this, we’ll get the full cache description, and we’ll see extra waypoints at the bottom, reading the description is something that’s always wise to do, toknow what’s going to meat us at GZ.
Print description
By pressing ![]() behind the waypoint name, we see that we have a option called Description in Print, and by selecting this option, we can either enter our own description or copy existing description and edit it.
behind the waypoint name, we see that we have a option called Description in Print, and by selecting this option, we can either enter our own description or copy existing description and edit it.
 And we see in the waypoint list that we have got a separate icon that tells us that we have a description that will accompany the printout
Parking and other waypoints
By reading the description as mentioned above we will, as mentioned, either in the description or at the bottom as seperate waypoints, often find parking and reference waypoints.

So here I know that there are parking waypoints, and that the cache description says that I have to start at the burrial mound in the description.
So now I choose that I want the insertion point over this cache and press the “down arrow” menu ![]() .
.
 Here I choose: copy waypoints from cache to trip and then set a new insertion point below the cache and repeat the procedure.

Here we see that I have received coordinates over and under, but I like to arrive at the parking coordinates first, and here the reference point is liste before the parking, we can easily fix this by moving the mouse pointer in this case to waypoint No. 3 press the left mouse button and drag the waypoint above No. 2 before we release, Now we just have to remember to press the green save sorting button at the top right. Then we repeat with waypoints downwards, if there are no suggestions for parking / trailhead or similar as waypoints, or in the cache description / logs, then I have a good tip that in the drop-down menu we choose to show in Google Maps (streetview), we can look around for something that may look like a suitable place to park and we can then create our own parking coordinates by doing as we did when we entered ferries. Alternatively, it may in some areas be built good aerial map aviliable on cachetur which gives us a good idea of whether it is possible to park there or not.
To be continued in part 4
This post is also available in:
Deutsch (German)